Git common Commands
General Introduction
Git is a distributed version control system for tracking changes in source code during software development. It is designed for coordinating work among multiple people, and it allows users to keep track of different versions of files, revert back to previous versions, and merge changes from different sources. Git is widely used by software developers and is considered a standard tool in the software development industry.
The perfect commit
The aim of each commit is to provide an easy way to track the changes of the Git repository. Each commit should contain small and clear changes and avoid big commits which are difficult to understand in the future by someone.
A “perfect” commit in Git is one that is clear, concise, and atomic. Here are some characteristics of a good commit:
-
Atomic: A commit should contain changes that are related to a single, well-defined task or change. This makes it easier to understand and roll back if necessary.
-
Self-contained: A commit should include all necessary changes to fully implement a feature or fix a bug. This makes it easier to review, test and maintain.
-
Well-documented: A commit should have a clear and informative commit message that describes the changes made and the reasoning behind them. This makes it easier to understand the context of the changes and why they were made.
-
Tested: A commit should include changes that have been thoroughly tested and are known to be working. This reduces the risk of introducing bugs or regressions.
-
Small: A commit should be as small as possible while still being atomic. This makes it easier to review, test and maintain.
-
Well-timed: A commit should be made at the right time, when the changes are fully implemented, tested and reviewed. This makes it easier to keep track of progress and maintain a clean history.
It’s important to note that while it’s good to strive for perfect commits, it’s not always possible to achieve them in practice. Sometimes, you may need to make a commit that is not fully self-contained or atomic, but it’s important to make sure that the commit message clearly explains the context and reasoning behind the changes.
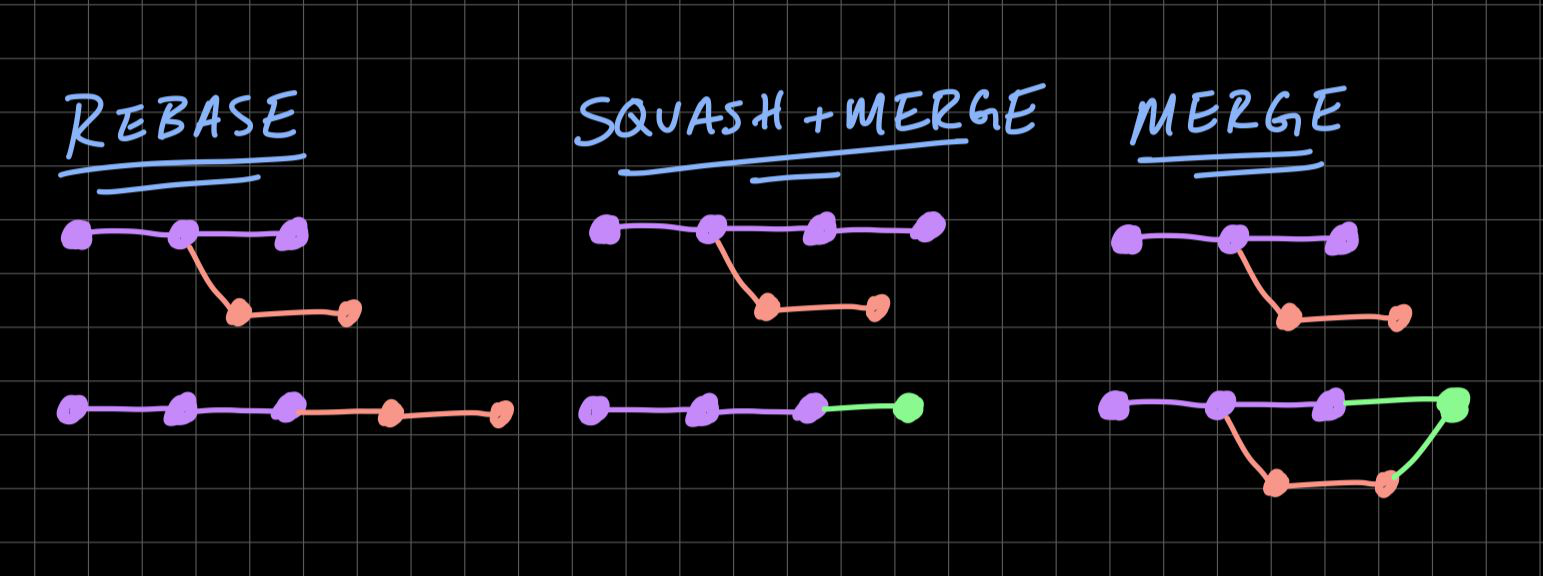
Merge vs Rebase
git merge and git rebase are both used to integrate changes from one branch into another, but they do so in different ways.
git merge creates a new merge commit in the target branch that brings in all the changes from the source branch. This results in a linear history with multiple branches merging into the main branch. It is a simple way of integrating changes and useful when you want to preserve the entire branch history.
git rebase replays the commits from the source branch on top of the target branch, creating new commits in the process. This results in a linear history, with the commits from the source branch appearing as if they were made at a later point in time. It’s a good option when you want to keep the branch history clean and avoid unnecessary merge commits.
It’s important to note that git rebase can have some drawbacks like rewriting the commit history, it can cause conflicts and can lead to loss of commits, so it’s better to use it with caution when working in a team.
In summary, git merge is useful when you want to preserve the entire branch history, while git rebase is useful when you want to keep the branch history clean and avoid unnecessary merge commits.
Types of Merge
There are several types of merge in Git, each with its own set of benefits and use cases:
-
Fast-forward merge: This type of merge is used when the current branch is a direct ancestor of the branch being merged. The current branch’s pointer is simply moved forward to point to the same commit as the branch being merged. This type of merge does not create a new commit and results in a linear history. -
Recursive merge: This is the default merge strategy in Git. It creates a new merge commit that brings in all the changes from the branch being merged. It is useful when you want to preserve the entire branch history. -
Octopus merge: This type of merge is used when merging multiple branches at once. It creates a new merge commit for each branch being merged and results in a complex history. -
Squash merge: This type of merge is used when you want to combine multiple commits from a branch into a single commit. It is useful when you want to keep the branch history clean and avoid unnecessary merge commits. -
Three-way merge: This type of merge uses a common ancestor to resolve any conflicts that may arise when merging branches. It is useful when you have multiple branches with independent changes and want to bring those changes together.
It’s important to note that the type of merge you choose will depend on your project’s requirements and workflow, and it’s important to communicate with other team members when you’re planning to use one of these types of merge.
Rewriting history
Rewriting history in Git refers to changing the commit history of a branch. This can include things like amending or reordering commits, squashing multiple commits into one, or even removing commits entirely.
There are several Git commands that allow you to rewrite history, such as git commit --amend, git rebase -i, git filter-branch, and git push -f.
It’s important to note that rewriting history can have consequences, particularly when working in a collaborative environment. When rewriting history, the new commits will have different SHA-1 hashes than the original commits, making it difficult to track which commits were changed and when. It can also cause conflicts if other team members have already pulled the original commits and made changes based on them.
For this reason, it’s generally considered best practice to avoid rewriting history on branches that have been shared with others or on branches that are part of a public repository. Rewriting history should only be done on branches that are local or on branches that are only shared with a small number of trusted team members.
In summary, rewriting history in git refers to the process of changing the commit history on a branch. It can have consequences, particularly when working in a collaborative environment, and it should be done with caution.
Git squash
git git squash is a way to combine multiple commits into a single commit in Git. This is useful when you want to keep the branch history clean and avoid having multiple commits that represent small, incremental changes. It’s also useful when you want to simplify the history before merging it into another branch.
For example, let’s say you’re working on a feature branch and you’ve made several commits that include small changes, bug fixes, and intermediate commits, you can use git squash to condense all those commits into a single commit that represents the final version of your work.
Here’s an example of how you might use git squash:
\# Start an interactive rebase
$ git rebase -i HEAD~4

\# This will open a text editor with the last 4 commits listed.
\# Change the first word of each commit to "squash"
\# except the one you want to keep as it is

\# Save and close the editor

\# This will squash the last 3 commits into the first commit

\# You can edit the commit message as well if you want

\# Finally, use `git push --force` to update the remote branch with the new history.
Starting a new Git repository
Your first instinct, when you start to do something new, should always be git init.
Git init is a command used to initialize a new Git repository. It creates a new directory named .git that contains all of the necessary files for version control, including the repository’s history. This command should be executed in the top-level directory of the project that you want to track with Git. Once the repository is initialized, you can use Git commands to track changes to the project’s files and collaborate with others.
Type:
git init
Type git add to add all of the relevant files.
git add .
You will probably want to create a .gitignore file right away, to indicate all of the files you don’t want to track.
git add .gitignore
git commit -m "ENTER COMMIT MESSAGE"
Now its time to go to Github or to other Git repository. Initialize the repository without a README file (If you have already a README file or any other commit in the repository, you need to do a git pull first, if not you will receive the following error: Updates were rejected because the tip of your current branch is behind).
Click the “Create repository” button.
git remote add origin git@github.com:username/new_repo
git push -u origin master
Git fetch vs Git pull
When downloading content from a remote repo, git pull and git fetch commands are available to accomplish the task. You can consider git fetch the ‘safe’ version of the two commands.
It will download the remote content but not update your local repo’s working state, leaving your current work intact. git pull is the more aggressive alternative; it will download the remote content for the active local branch and immediately execute git merge to create a merge commit for the new remote content. If you have pending changes in progress this will cause conflicts and kick-off the merge conflict resolution flow.
Most used Git commands
-
git init
-
git clone
-
git add
-
git commit
-
git status
-
git log
-
git diff
-
git show
-
git branch: shows the current local branches in a Git repository. -
git branch -a: shows all branches in a Git repository, both local and remote. -
git checkout
-
git merge
-
git pull
-
git pull --rebase: A rebase pull does not create the new commit. Instead, the rebase has copied the remote commits and rewritten the local commits E–F–G to appear after them them in the local origin/main commit history. The –rebase option can be used to ensure a linear history by preventing unnecessary merge commits. -
git push
-
git remote
-
git fetch: The git fetch command downloads commits, files, and refs from a remote repository into your local repository. Fetching is what you do when you want to see what everybody else has been working on. -
git fetch --all: Fetch all the branches from the remote repository. -
git config
-
git stash
-
git tag
-
git blame
-
git gc
-
git ls-tree
-
git mv
-
git rm
-
git revert
-
git cherry-pick
-
git rebase
-
git bisect
-
git filter-branch
-
git submodule
-
git shortlog
-
git describe
-
git archive
-
git grep
-
git instaweb
-
git daemon
-
git svn
-
git send-email
-
git request-pull
-
git format-patch
-
git am
-
git help
-
git gui
-
git-flow
-
git-p4
-
git-svn
-
git-cvs
-
git-remote-ftp
git-remote-ftps git-remote-http git-remote-https git-remote-rsync git-remote-testsvn git-remote-testgit git-remote-bzr git-remote-hg git-remote-mediawiki git-remote-daemon git-remote-ext git-remote-fd git-remote-ftp git-remote-ftps git-remote-http git-remote-https git-remote-rsync git-remote-testsvn git-remote-testgit git-remote-bzr git-remote-hg git-remote-mediawiki git-remote-daemon git-remote-ext git-remote-fd git-remote-ftp git-remote-ftps git-remote-http git-remote-https git-remote-rsync git-remote-testsvn git-remote-testgit git-remote-bzr git-remote-hg git-remote-mediawiki git-remote-daemon git-remote-ext git-remote-fd git-remote-ftp git-remote-ftps git-remote-http git-remote-https git-remote-rsync git-remote-testsvn git-remote-testgit git-remote-bzr git-remote-hg git-remote-mediawiki git-remote-daemon git-remote-ext